AMD R9 290x 显卡直通 VMware ESXi
For those of you looking to use there R9 290x with a virtualization software below I'll detail how I got ESXi GPU passthrough to work with my R9 290x. I spent many days trying to figure out how to get this to work with no luck. Only to find that I had making a small and stupid mistake. Below are the details on my build if others are curious as to what I'm using. I wouldn't recommend others use this exact build because it is a little limiting as far memory capabilities.
My build
- PowerColor PCS+ AMD Radeon R9 290X 4GB GDDR5 2DVI/HDMI/DisplayPort PCI-Express Video Card AXR9 290X 4GBD5-PPDHE
- Gigabyte LGA 1150 Intel Z97N Wi-Fi Bluetooth HDMI SATA 6Gb/s USB 3.0 Mini ITX DDR3 1600 Motherboards GA-Z97N-WIFI
- Intel Core i7-4790K Processor (8M Cache, up to 4.40 GHz) (BX80646I74790K)
- Cooler Master Seidon 120M - PC CPU Liquid Water Cooling System, All-In-One Kit with 120mm Radiator and Fan
- WD Black 2TB Performance Desktop Hard Drive: 3.5-inch, SATA 6 Gb/s, 7200 RPM, 64MB Cache WD2003FZEX
- Samsung 840 EVO 250GB 2.5-Inch SATA III Internal SSD (MZ-7TE250BW) x 2
- Corsair Vengeance 16GB (2x8GB) DDR3 1600 MHz (PC3 12800) Desktop Memory (CMZ16GX3M2A1600C10)
- Cooler Master Elite 130 - Mini-ITX Computer Case with Mesh Front Panel and Water Cooling Support
- Pioneer Electronics USA Blu Ray Combo Drive, BDC-207DBK
For this build I was using ESXi 5.5 with custom drivers added to the iso before being being flashed to a flash drive. The drivers were needed for the two onboard gigabit ethernet jacks and the onboard SATA controller. As far as how to create the custom ISO I'm going to have to refer you to this post. As for which drivers were needed you can get the from the following places. SATA AHCI Driver from here, Atheros AR8161 from here, and the Intel e1000e from here.
Make sure you have VT-d enabled in your bios and make sure all of your hardware supports it. Next simply do a normal setup for ESXi. I installed ESXi on one of the SSDs and then made the remaining space of that drive into a Datastore along with the rest of the drives of the system. In my setup all of the VMs run off the SSDs with another partition added for storage. This extra partition is simply a VMDK on the 2tb drive. In order to configure everything you will also need another windows systems to connect to your new system and configure it.
Configure Passthrough
Once you have all of this setup you can start creating the VM that you will want to pass the graphics card through to. I chose to make it a Windows 8.1 system simply because I noticed my graphics card performed better on Windows 8 than on Windows 7. Once you have your VM setup on the system you will have to enable passthrough for that card. You can do this by first clicking on your server in the left hand column of the vSphere Client. Once you select your server on the left hand pane you will want to select the "Configuration" tab in the right hand pane. Under this tab on the left hand side you will want to select "Advanced Settings". Under the that section you should now see a menu with the title "DirectPath I/O Configuration". This menu is where you can select which devices will be passed through on your server. You will want to click on the button in the top right corner. This is where you will be able to select which devices you will want to pass through. First start by selecting the R9 290x from this menu like the following.

It will probably prompt you that you must select both devices. This is fine just continue and have both passed through. Once this is done you have to shutdown the server before this device can be passed through. If you'd like to pass anything else through you'd probably want to do it now because you will have to reboot each time you'd like to pass through another device. I personally passthrough my usb controllers and onboard audio.
Configure VM for Passthrough
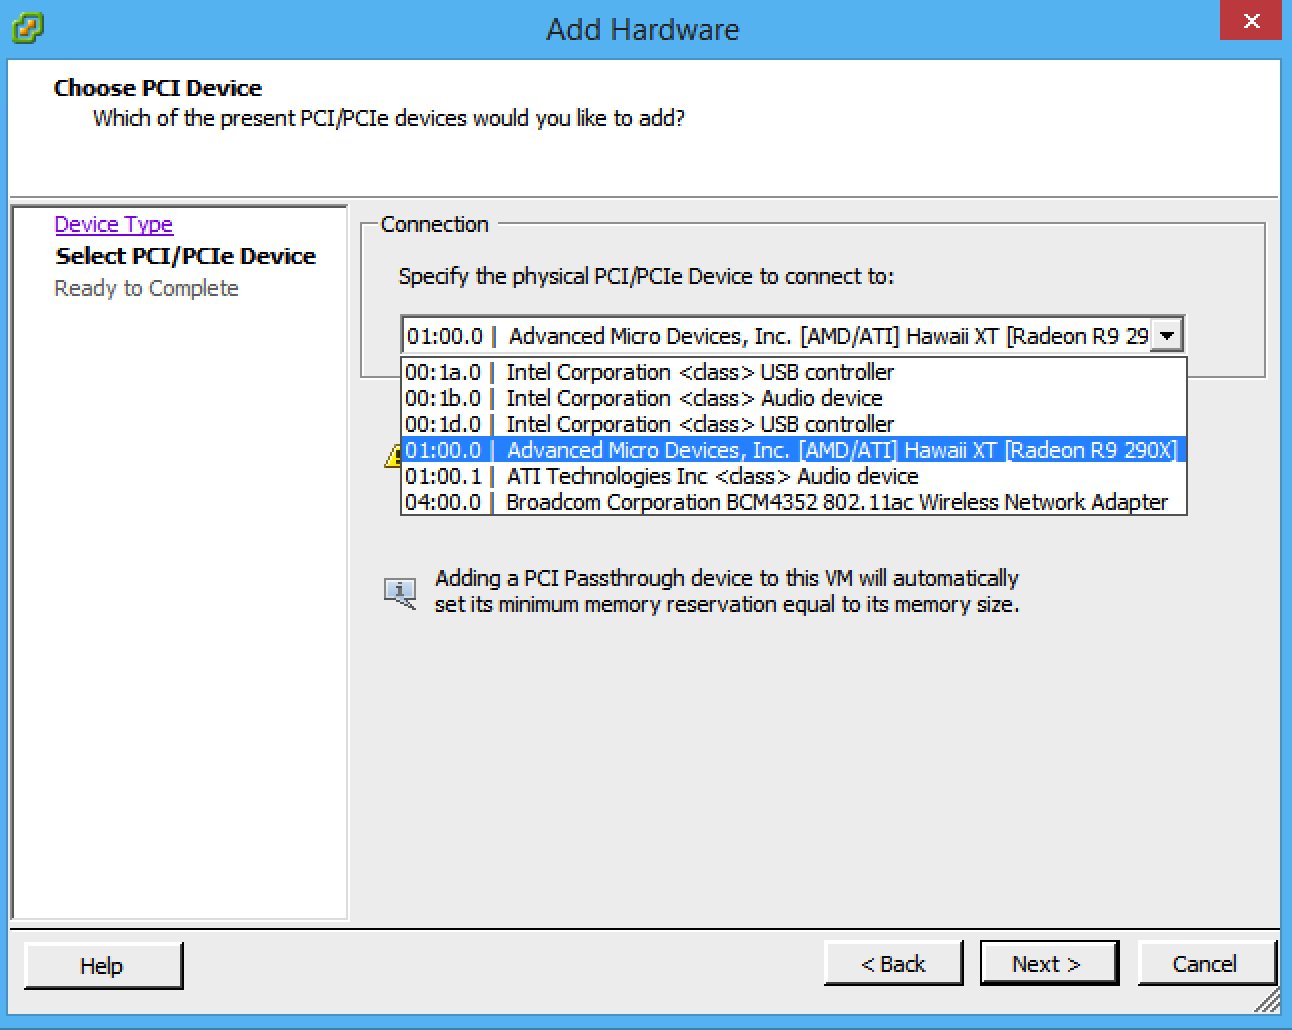
First you will want to set up the VM just like any other VM you'd setup. Make sure you don't do anything as far as passing through devices just yet. You will want to fully setup the VM before doing any passing through of devices. After will have to do the following. Shutdown the VM then edit the settings. From the edit settings menu you will want to add a device. From the add device wizard you will want to add a PCI Device.

Make sure you do not add labeled "ATI Technologies Inc Audio device". If you add this device you will have the VM blue screen on you. Once everything is added you will want to install the drivers for all the devices you added. That's all it takes to get it working. It all seem simple now but make sure you don't add the audio device that's a part of the graphics card.
千万不要选"ATI Technologies Inc Audio device",选了这个设备,虚拟机将会蓝屏。
[VMware] VMware Workstation 15无法看到USB驱动器
[esxi] esxi 6.7 u2提示“分配至该主机的证书尚未生效”
[VMware] 在VMWare WorkStation上安装64位操作系统
[esxi] ESXI和vSphere的安装配置-实现一台电脑硬件虚拟化为两台
[VMware] U盘安装ESXi5.5 update1遇到了Lonading lsi_mr3.v00 不动的解决方法
[esxi] Z390在ESXI下N卡直通USB直通教程(更新功耗测试开启SMB3.0)
[VMware] VMware下centos 6网卡的添加
[esxi] 使用虚拟机ESXI,显卡直通VM,使一台实体机虚拟成HTPC、WEB服务器、NAS服务器等经验
VMware Workstation 15无法看到USB驱动器
AMD R9 290x 显卡直通 VMware ESXi
esxi 6.7 u2提示“分配至该主机的证书尚未生效”
ESXI和vSphere的安装配置-实现一台电脑硬件虚拟化为两台
Z390在ESXI下N卡直通USB直通教程(更新功耗测试开启SMB3.0)
使用虚拟机ESXI,显卡直通VM,使一台实体机虚拟成HTPC、WEB服务器、NAS服务器等经验
用虚拟机玩游戏的经验总结,虚拟机提供显示性能直连显卡
使用 Vagrant 打造跨平台开发环境
在VMWare WorkStation上安装64位操作系统